![]()
Mobile Assessment Tool User Manual
1.1 Getting Started – Home Page
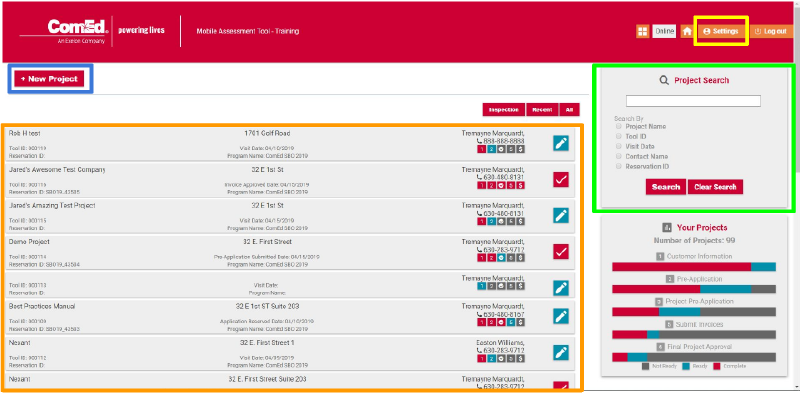
Image 1.1 (click to enlarge)
- Upon logging into the Mobile Assessment Tool, you will be navigated to the landing page where users can create new projects, view/edit existing projects, and update company information/equipment library.
- Creating a new project can be done by using the button highlighted in blue
- Projects can be searched using the search bar highlighted in green
- Projects can be viewed and opened by finding them in the project list highlighted in orange
- Company information and equipment libraries can be edited by selecting the Settings button highlighted in yellow
1.2 Getting Started – Using the Project Archiving and Filtering Tool
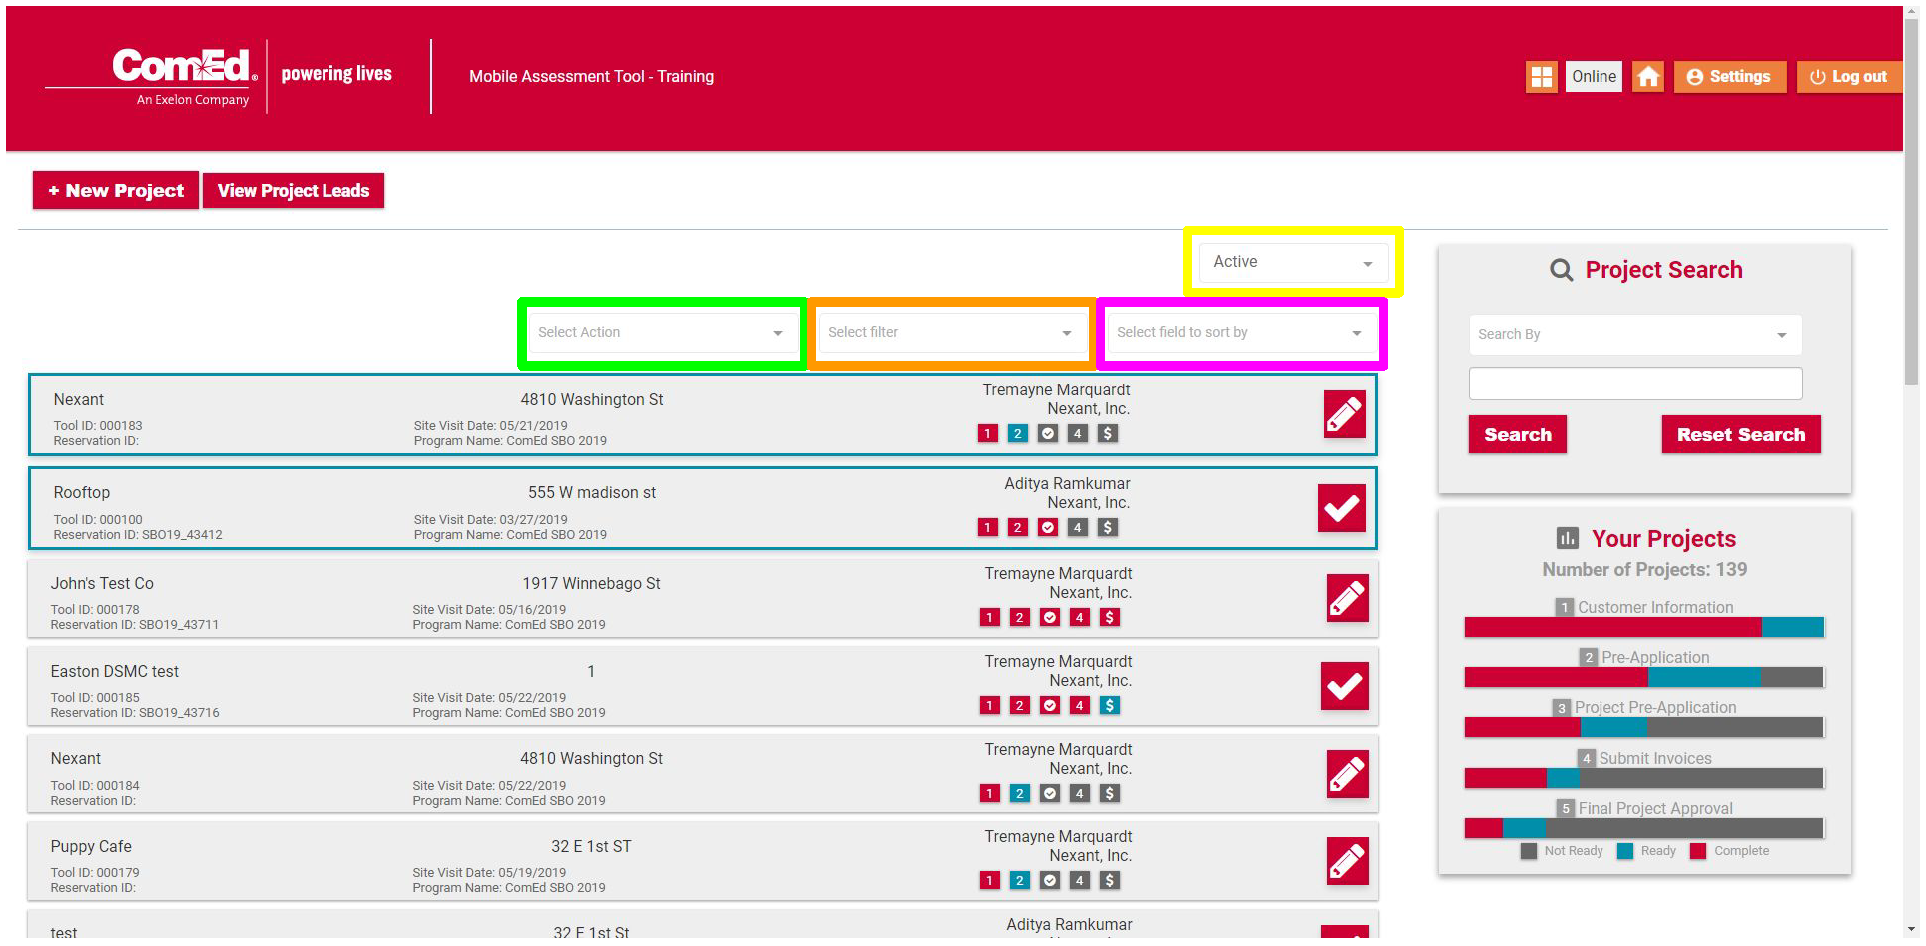
Image 1.2 (click to enlarge)
- Users have the ability to customize the projects that are listed on their homepage by utilizing the Project Archiving/Activating function.
- In order to use the archiving function, the user must first select projects to be archived or activated. This can be done by clicking on the body of a project and causing it to become outlined in blue. Once project(s) have been selected, the user will then use the “Select Action” dropdown box highlighted in green in order to “archive” or “activate” a project. The “Select Action” option that is available will be determined by the current status of the project. Projects that are currently archived can be reactivated and conversely, currently active projects can be archived.
- These statuses refer only to the list that projects will be viewable in by the user. These statuses do not affect review status or approval by the Nexant review team.
- The box highlighted in yellow allows the user to select which list of projects are displayed on the homepage.
- – “Active”, “Archived”, or “All”, are the selectable options for filtering projects using this dropdown box.
- Projects can be further filtered using the Filtering tools.
- The dropdown box highlighted in orange allows the user to filter by projects that are currently marked for inspection. When this filter is used, only projects that are currently marked for inspection will be displayed on the homepage.
- The dropdown box highlighted in pink allows the user to filter projects by “Project Name” and “Project Phase”.
- Utilizing the “Project Name” filter will alphabetize the projects for the user
- Utilizing the “Project Phase” filter will order the projects by the phase they are currently in beginning with Phase 1 and descending to Phase 5 (denoted by the $ icon)
1.3 Getting Started – Viewing Project Status

Image 1.3 (click to enlarge)
- Project status can be viewed for each project from the Home Page. There are five (5) possible project stages with three (3) of them being Service Provider-owned and two (2) of them being stages in which Nexant must review and approve project information. Active stages are shown by being colored blue with completed stages being colored red. The project status is shown on the far right of each project’s main body in the project list.
- The first step is the “Customer Information” phase and an example of a project in this stage is highlighted in blue. This is a Service Provider stage.
- The second step is the “Pre-Application” phase and an example of a project in this stage is highlighted in yellow. This is a Service Provider stage.
- The third step is the “Pre-Application Review” phase and an example of a project in this stage is highlighted in green. This is a Nexant stage.
- The fourth step is the “Final Approval Submission” phase and an example of a project in this stage is highlighted in orange. This is a Service Provider stage.
- The fifth step is the “Final Approval Review” phase and an example of a project in this stage is highlighted in pink. This is a Nexant stage.
- The comprehensive list of projects and their stages can be viewed on the bottom right-hand side of the page in the box highlighted in red.
1.4 Getting Started – Setting Up Equipment Library
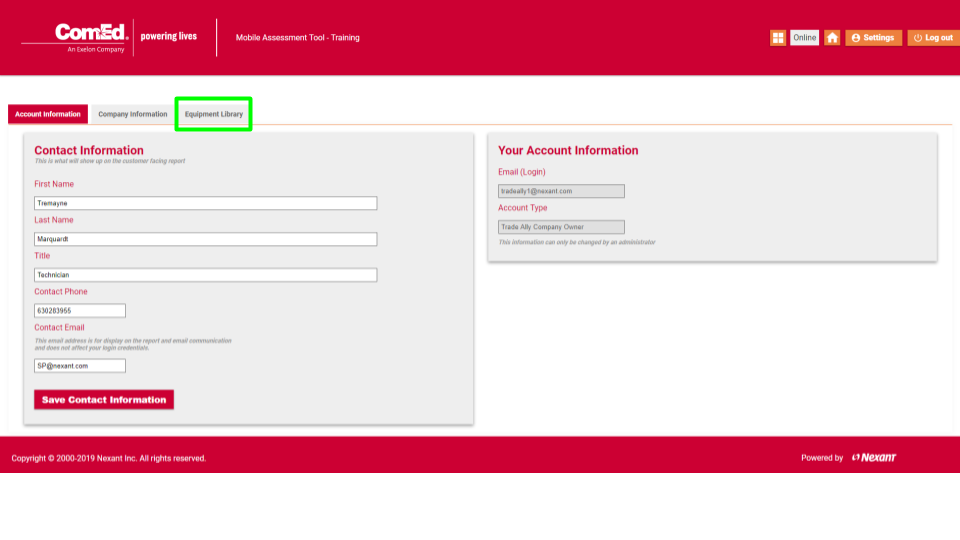
Image 1.4a (click to enlarge)
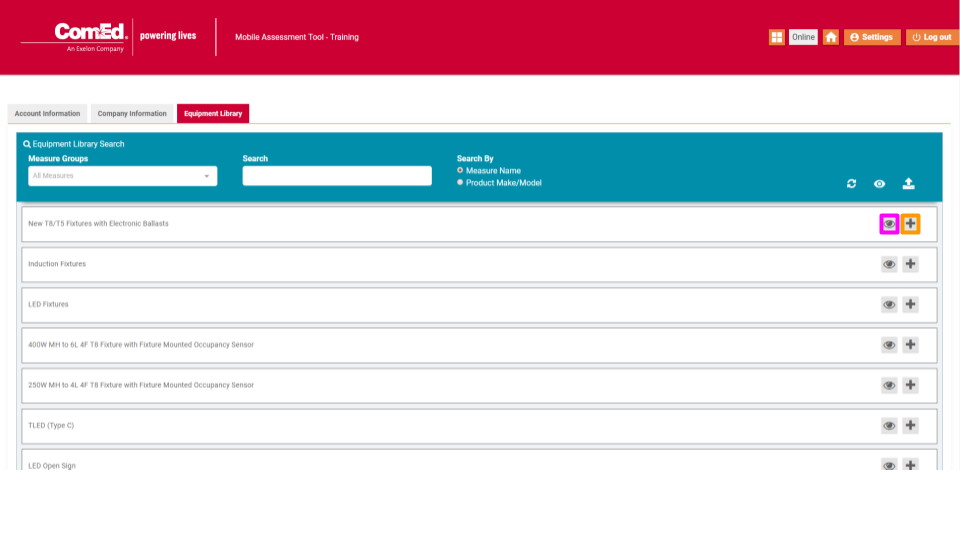
Image 1.4b (click to enlarge)
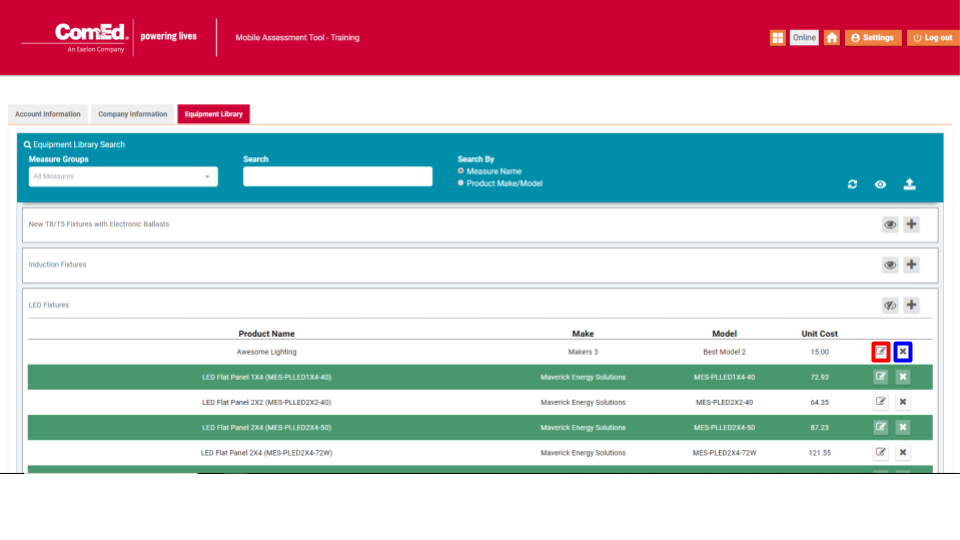
Image 1.4c (click to enlarge)
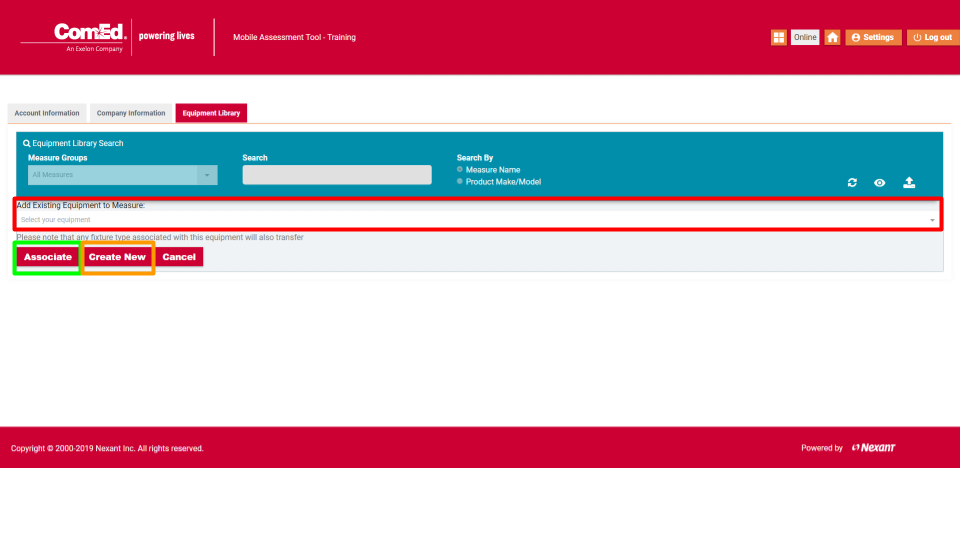
Image 1.4d (click to enlarge)
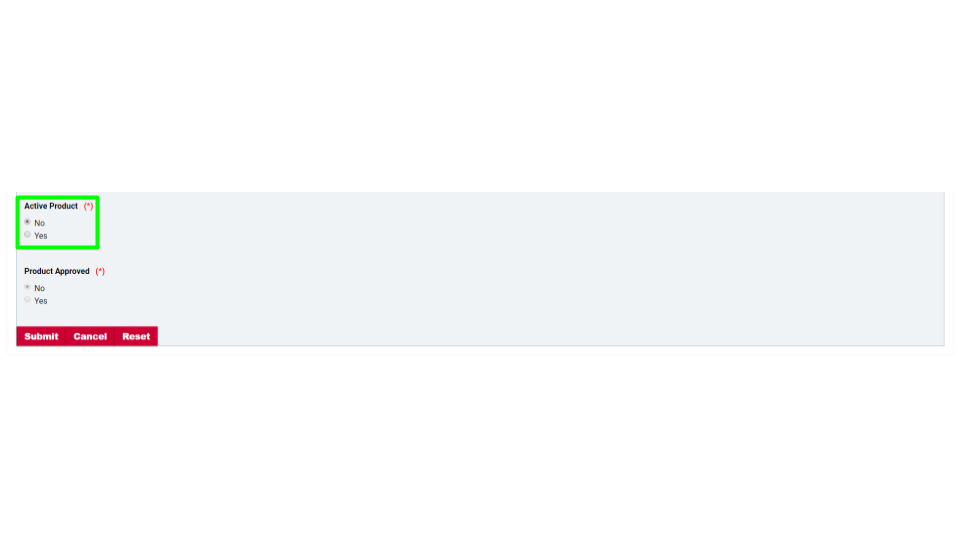
Image 1.4e (click to enlarge)
- Before users may begin entering projects into the Mobile Assessment Tool, the equipment library must be updated with products that Service Providers will be installing at their customer’s facilities.
- To find the equipment library, the user must navigate to the Settings button (yellow box in Image 1.1). Only users with the “Company Owner” permission level are able to view/edit an equipment library. All users, regardless of permission level, from a company will share an equipment library so products only need to be entered once by a “Company Owner” user.
- Once in the Settings page, the user must click the “Equipment Library” button to navigate to the existing equipment library list and uploading tool for new products (green box in Image 1.4a).
- Products must be entered for each measure that they are to be used for. Existing products can be viewed using the eyeball icon highlighted in the pink box. This will open a dropdown view that displays all products that have been entered by the Service Provider for that measure. (shown in Image 1.4b)
- Products can be edited by clicking the button highlighted in a red box or deleted using the button highlighted in blue box (shown in Image 1.4c)
- In order to enter a new product, the “+” icon highlighted in the orange box must be clicked. The user will be navigated to the product upload page where new equipment can be added or existing equipment can be associated
- The “Associate” button highlighted in a green box can be used to associate existing equipment from another measure with the measure that has been selected. For example, an LED tube that qualifies for multiple lighting measures only needs to be entered once. This product can be selected from the dropdown box highlighted in red and then by clicking “Associate”, this product is added to the equipment library for the selected measure.
- The “Create New” button highlighted in orange must be used for a new product that is not already existing for any measure in the equipment library. Upon clicking this button, the user will be navigated to a page with the required fields for that specific measure’s equipment. Requirements vary by measure type, please reach out to your Project Coordinator with questions regarding required fields.
- Service Providers have the option to add/remove products from the available options that all company users can select from when entering products.
- At the bottom of every measure’s required fields in the “Create New” product page is a “Active Product” field with a Yes/No option (highlighted in green in Image 1.4e). Active products will be displayed and inactive products will not be displayed under available options when entering measures at the individual project level.
2.1 Pre-Application – Entering Customer and Facility Information for a New Project
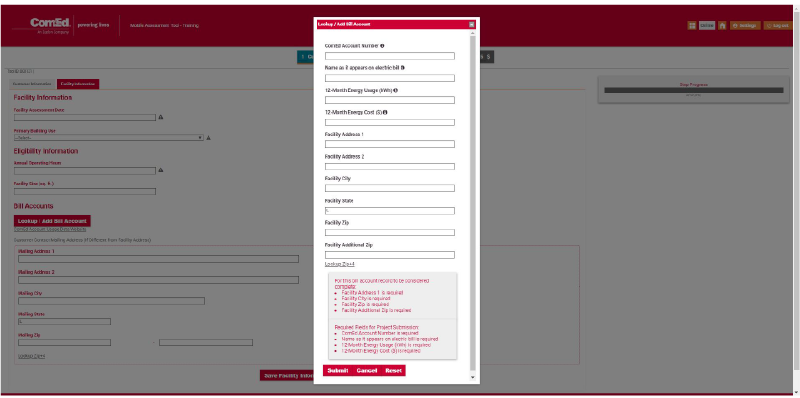
Image 2.1c (click to enlarge)
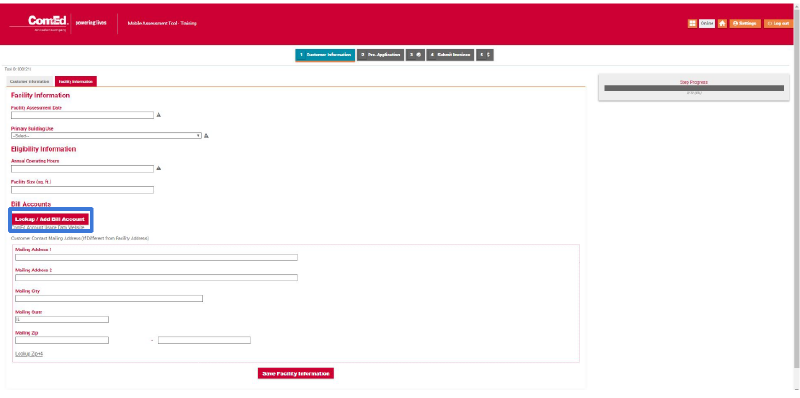
Image 2.1b (click to enlarge)

Image 2.1a (click to enlarge)
- After creating a project, users are required to fill out Customer and Facility Information
- The first tab is for customer contact information (see image 2.1a)
- The second tab is for facility information, it is crucial that this information is as accurate as possible as it is used to calculate energy and cost savings for the customer (see image 2.1b)
- The ComEd bill information is entered on this tab using the Look/Add Bill Account button highlighted in blue.
- Selecting the Look/Add Bill Account button will cause an entry tool to pop up where account information can be entered (see image 2.1c)
2.2 Pre-Application – Entering Measures into the Assessment Scope of Work
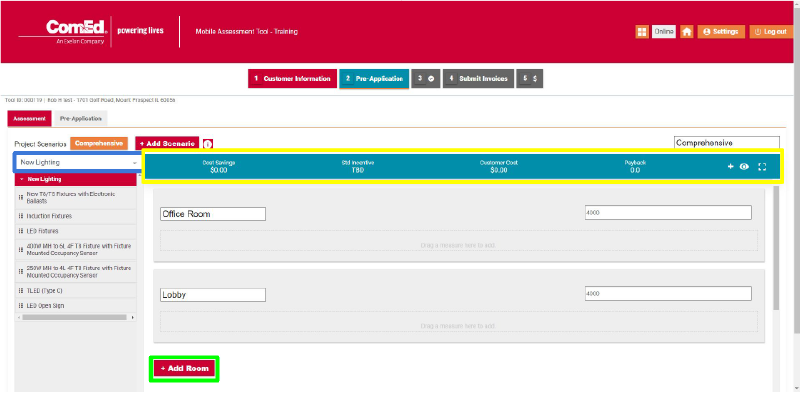
Image 2.2 (click to enlarge)
- After entering Customer/Facility information, users are required to enter the Assessment information for the customer’s scope of work
- Rooms can be created by selecting the button highlighted in green
- Rooms can have their names changed to the user’s preference
- Measure categories can be selected by clicking the drop down arrow box highlighted in blue
- Individual measures within each measure category can be clicked (toggle) and then dragged into rooms in the scope of work
- Summary information for the project is automatically calculated and displayed in the top bar of the scope of work area highlighted in yellow
- Rooms can be created by selecting the button highlighted in green
2.3 Pre-Application – Editing measures in the Assessment Scope of Work

Image 2.3 (click to enlarge)
- Once measures have been added to the scope of work, they can be “selected/unselected” by clicking the main body of the measure. This will cause the measure to become added or removed from the project. The RTU Sealing measure highlighted in blue is an example of a selected measure. The Non-Programmable Thermostat to Smart or Advanced Thermostat highlighted in green is an example of an unselected measure
- In order to enter required inputs for measures, users must select the gear icon located at the far right of each measure’s main body. The gear icon is highlighted in yellow for both measures in the picture below
2.4 Pre-Application – Entering Required Documents for Pre-Application Submission

Image 2.4 (click to enlarge)
- Once the Assessment scope of work has been entered, users will need to select the “Pre-Application” tab highlighted in yellow and attach several required documents before submitting a project application.
- The first required document is the Assessment Report and Program Agreement that must be signed by the customer. The program agreement can be generated into a PDF (using the Generate Report PDF button highlighted in dark blue) and printed out for signature or the Mobile Assessment Tool has an electronic Adobe e-signature tool that can be signed via email by a customer (using the Generate Signing Document button highlighted in dark blue)
- If the user selects to have the customer sign a physical copy, it can be attached using the “Click Here to Upload Files” button highlighted inside the green box
- If the user selects the Adobe e-signature feature, upon being signed via email by the customer, the Program Agreement will be automatically attached.
- The second required document is a copy of the customer’s ComEd utility bill. This can be attached using the “Click Here to Upload Files” button highlighted inside of the orange box
- The final required information is the estimated completion date of the project. Please use your best judgement to enter as accurate of a prediction as possible for the installation in the box highlighted in light blue.
- The first required document is the Assessment Report and Program Agreement that must be signed by the customer. The program agreement can be generated into a PDF (using the Generate Report PDF button highlighted in dark blue) and printed out for signature or the Mobile Assessment Tool has an electronic Adobe e-signature tool that can be signed via email by a customer (using the Generate Signing Document button highlighted in dark blue)
- Once all of the necessary documents and information have been entered, the “Pre-Application Checklist” highlighted in pink will populate with checkmarks next to each required item and allow the user to submit the project using the “Submit Pre-Application” button below.
3.1 Final Approval – Entering Required Documents for Final Project Approval Submission
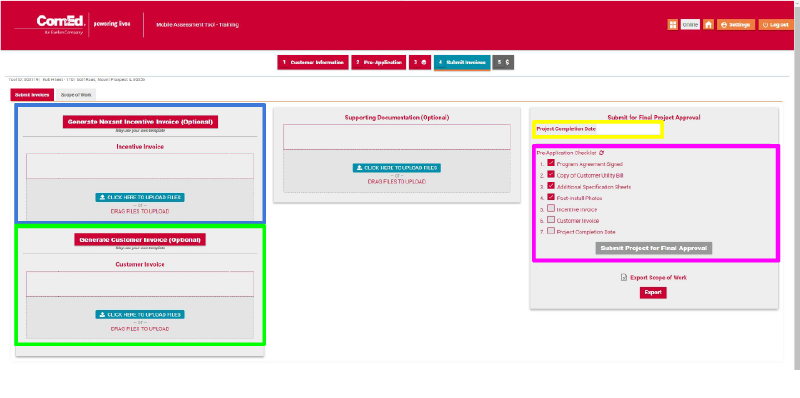
Image 3.1 (click to enlarge)
- The first required document for Final Project Approval is the “Incentive Invoice”. Nexant offers an easy-to-use Incentive Invoice Generator that is highlighted in blue. Service Providers can choose to use their own template as long as it contains all of the same information as the Nexant template.
- The second required document is the “Customer Invoice”. Nexant offers an easy-to-use Customer Invoice Generator that is highlighted in green. Service Providers can choose to use their own template as long as it contains all of the same information as the Nexant template.
- The final required information is the “Project Completion Date” entry form that is highlighted in yellow.
- Once all of the necessary items have been entered/attached, the checklist items will populate in the list highlighted by the pink box. At this point, the “Submit Project for Final Approval” button will become available and users can submit their project for Final Approval.
4.1 Email Notifications – Customer facing emails
- Program Agreement Signature Request
- If a Service Provider elects to use the Adobe e-signature feature, an email will be sent to the customer where the Program Agreement can be signed electronically
- Pre-Approval Notification
- This email notifies the customer that the Pre-Application has been approved for their project to proceed
- Project Completion Notification
- This email congratulates the customer on completing their project and thanks them for participating in the ComEd Energy Efficiency program
4.2 Email Notifications – Service Provider facing emails
- Program agreement signature received
- If a Service Provider elects to use the Adobe e-signature feature, a confirmation email will be sent once the customer has signed the Program Agreement via email
- Pre-approval notification
- Notifies service providers that funding is now officially reserved for the project and that they can begin installation
- Project On-Hold/Status Change Notification
- Notifies service providers that the project is placed on hold. Typically, projects are placed on hold for paperwork related reasons and the email will explain the issue. Reach out to your project coordinator if you need assistance with a project placed on hold
- Reservation Expiration Reminder
- Notifies service providers of projects where funding is set to expire soon. Projects must be completed within 60 days
- Inspection Completed/Waived
- Notifies service providers when a project marked for inspection has been inspected or waived
5.1 Key Milestones, Timelines, and Terms (terms to be added)
- Pre-Application Approval for Reservation
- Once a Pre-Application has been reviewed by the Nexant team, a Reservation of incentives will be granted to the Service Provider. At this point, the Service Provider may move forward with installing the project
- Service Providers will have 60 days from when the granted Reservation notice is sent out in order to complete the project’s installation.
- Once a Pre-Application has been reviewed by the Nexant team, a Reservation of incentives will be granted to the Service Provider. At this point, the Service Provider may move forward with installing the project
- Final Project Approval for Payment
- Once a Final Project Submission has been approved by the Nexant team, the project incentives will be paid out to the Service Provider
| Powered by |